4g61t.org

Specializing in the 3g CSM
It is currently Tue May 21, 2024 1:58 am

All times are UTC-05:00


Post new topic  Reply to topic  [ 144 posts ]  Go to page Previous 1 2 3 4 510 Next
Author Message
PostPosted: Mon Jul 11, 2011 5:33 pm 
Offline
Member

Joined: Thu Feb 26, 2009 11:15 am
Posts: 137
Location: San Diego
yep, that all makes sense. definitely understand your logic...was just hoping someone had an easy for sure answer from previous experience. unfortunately, it sounds like im treading some new water since people arent too familiar w/ these chassis' etc (expected given their rarity). well, if nothing else my documenting the process should make it easier if anyone else is as silly as me and decides to build one of these.

i'll keep you all updated as i move forward w/ the mystery subframe. thanks again for the help and suggestions.


Top
   
PostPosted: Mon Jul 11, 2011 5:34 pm 
Offline
Member

Joined: Thu Feb 26, 2009 11:15 am
Posts: 137
Location: San Diego
Quote:
Oh yeah, light a fire under Dan's butt and ask him to get me those measurements. :lol:
and what measurements are you looking for? i'll do my best to help next time at his house.


Top
   
PostPosted: Thu Jul 14, 2011 8:23 pm 
Offline
CSM Junkie

Joined: Wed Jan 30, 2008 7:55 pm
Posts: 447
Location: Saskatoon, Saskatchewan
Image


Top
   
PostPosted: Thu Jul 14, 2011 8:24 pm 
Offline
CSM Junkie

Joined: Wed Jan 30, 2008 7:55 pm
Posts: 447
Location: Saskatoon, Saskatchewan
dont know if that helps but that it the one that uses 2g mounts. I had it out (rebuilding tranny) so i thought i would measure it up for you


Top
   
PostPosted: Thu Jul 14, 2011 8:26 pm 
Offline
CSM Junkie

Joined: Wed Jan 30, 2008 7:55 pm
Posts: 447
Location: Saskatoon, Saskatchewan
The right side is the front All measurments are taken from center of holes, the piece of trim is in line with holes and the 1/4 and 1 1/4 is from center of south (in picture) holes to edge of mounts


Top
   
PostPosted: Mon Aug 01, 2011 10:00 am 
Offline
Member

Joined: Thu Feb 26, 2009 11:15 am
Posts: 137
Location: San Diego
Quote:
The right side is the front All measurments are taken from center of holes, the piece of trim is in line with holes and the 1/4 and 1 1/4 is from center of south (in picture) holes to edge of mounts
thanks for the help! i did a bunch of work on the car this weekend but totally forgot to write down this info and measure. have to wait until the next round but this will definitely help. thanks again.

update: did a quick measurement and the Colt/Vista subframe looks VERY similar to the 2G. interesting for sure. i also looked at the 1G's and found out that the subframe doesnt have the rear motor mount on it at all. it looks like it was only used for rigidity and the rear motor mount actually sits on the rear subframe that runs horizontal and parallel to the firewall.


Last edited by micah on Wed Aug 03, 2011 9:29 am, edited 2 times in total.

Top
   
PostPosted: Mon Aug 01, 2011 10:54 am 
Offline
Member

Joined: Thu Feb 26, 2009 11:15 am
Posts: 137
Location: San Diego
Round 5: Baby Steps

Sorry for the lengthy write-up but I have quite a bit to report and want to make this process easier for anyone attempting it in the future.

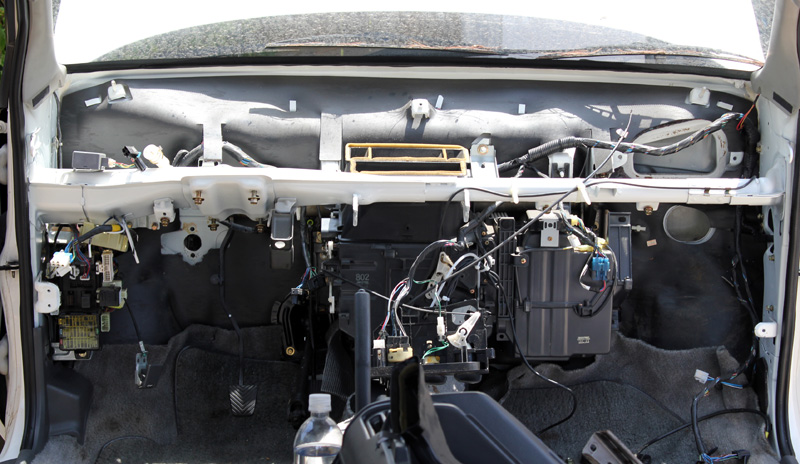
We had some down time trying to sort out the rear differential and I was also dreading the 5 speed conversion. I had removed all of the parts at the junkyard (brake pedal assembly, clutch pedal/MC/line, shifter and linkage) so knew what was involved and it was going to be a huge pain. As you all know, the brake booster is on the passenger side which means the bar connecting this to the pedal is running behind the HVAC components. I don't mind breaking parts at the junk yard but obviously don't want to damage my own car.

Since my AC system was working great I wanted to try to keep it all intact. We removed the compressor from the motor when we pulled the 4G64 and it looks like it will bolt up to the 4G63 just fine. The issue, however, is gaining access to swap out the brake pedal. Another problem is that my AC system is the old kind using R12 and I don't think its ever been converted (no sticker saying R134 anywhere) so the cost to get the system working again once its evacuated would be pretty hefty (something I obviously wanted to avoid).

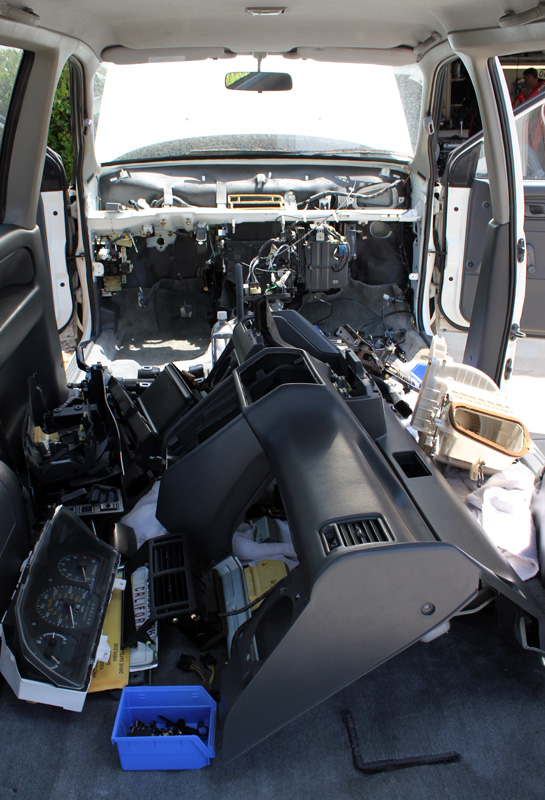
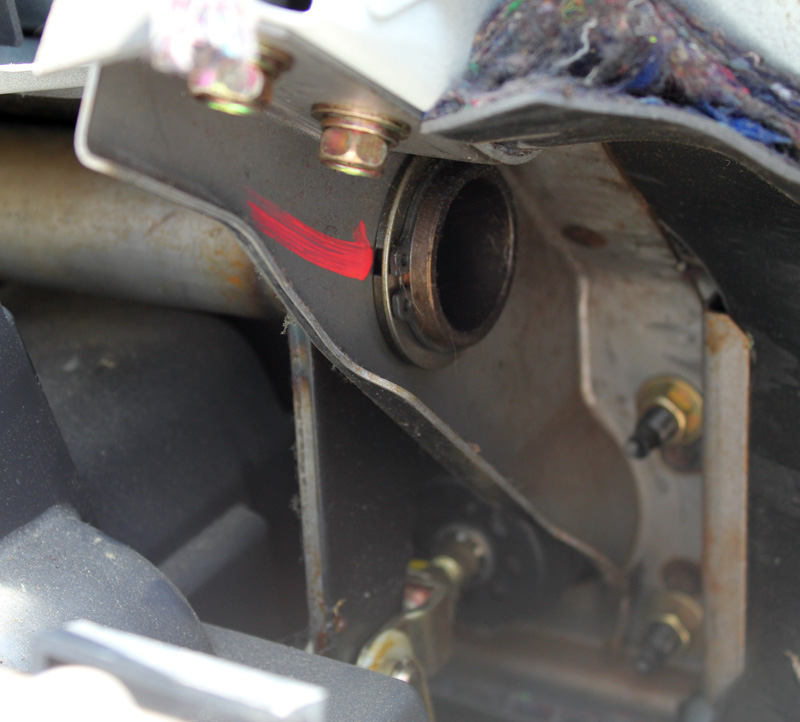
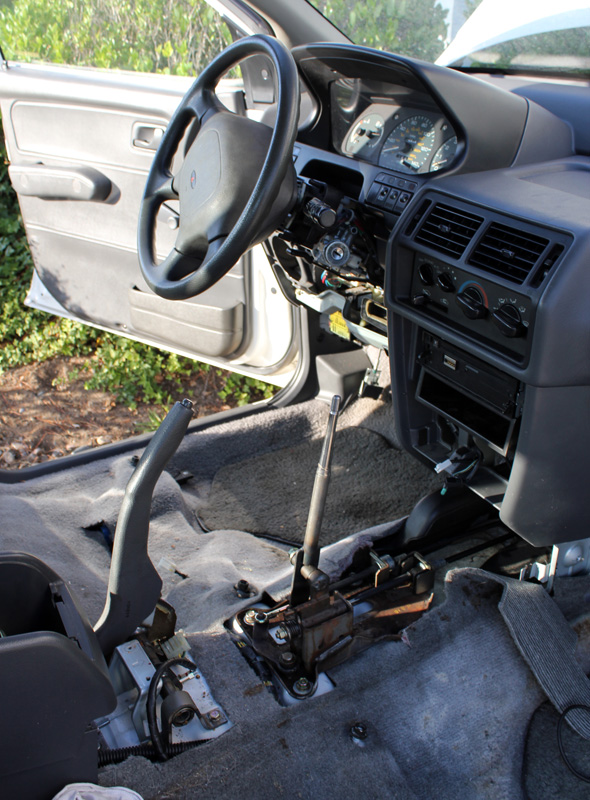
As you will see below, I pulled the dash and gained access to the pedal assembly and HVAC components. After taking a close look at everything I decided to first remove the blower motor on the passenger side of the car since this wouldn't require disconnecting any of the AC lines and would still allow me to remove the engine wiring harness (which also runs behind the HVAC components over to the stereo where the auto trans ECU is located). In the third picture below you can see how the brake pedal ties in to the booster.

Image

Image

The pedal is welded to the other end of this bar so the only way to actually remove the brake pedal is to disconnect it on the booster side of the car. After a closer look I was thinking about disconnecting the pin that connects to the booster and remove the C-clip on the end so the bar could slide out without the bulky brake booster bracket. Unfortunately, it still looked like it would be close to impossible to get the bar out since it is fairly long (not much room to free it on the driver side) and the metal tab that connects to the booster looked to be in the way as well.

Image

We did a test fit with the clutch pedal assembly and it was barely making contact with the auto brake pedal. So I took a close look at the brake pedal from the manual car and compared it to the auto. The arm that comes down from the bar looked identical with the only difference being a small pin welded at the top on the auto and a smaller pedal at the bottom of the manual one. It appears as though the factory uses the same arm and simply welds on a different pedal for each application. It was time to start cutting. I used the pedal pad as a template and cut the excess off of the brake pedal. I had to do some more trimming after the first two major cuts but am VERY pleased with the outcome.

Image

Image

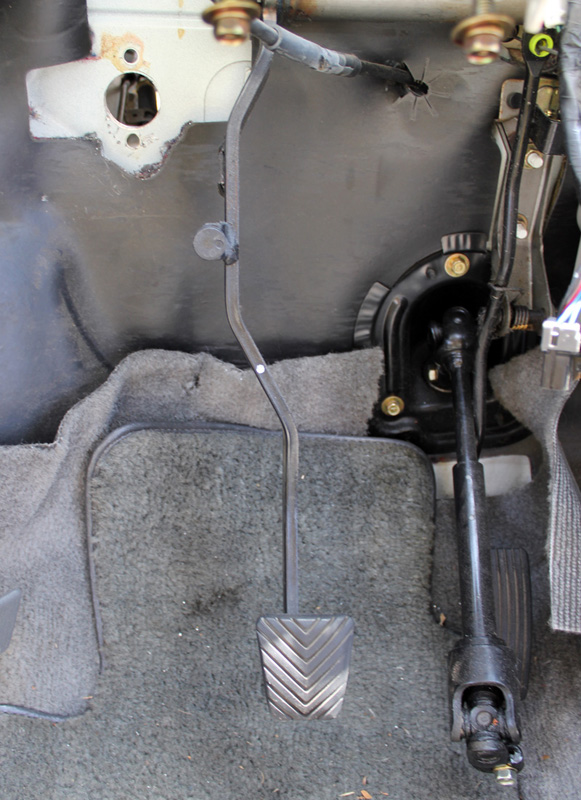
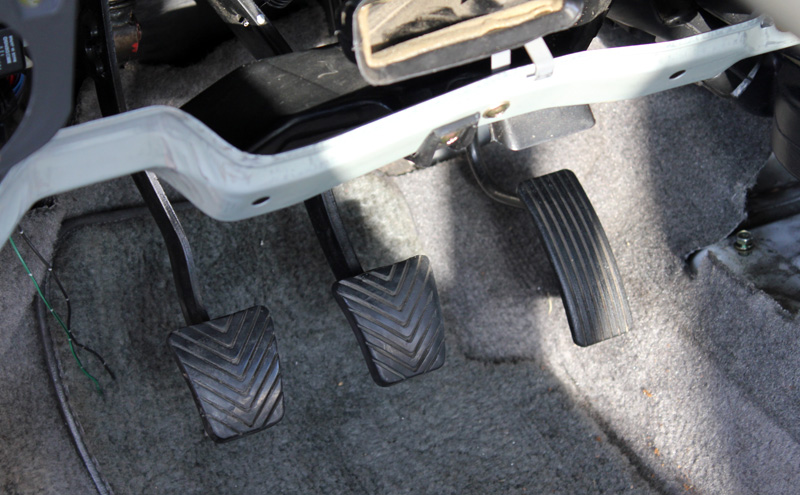
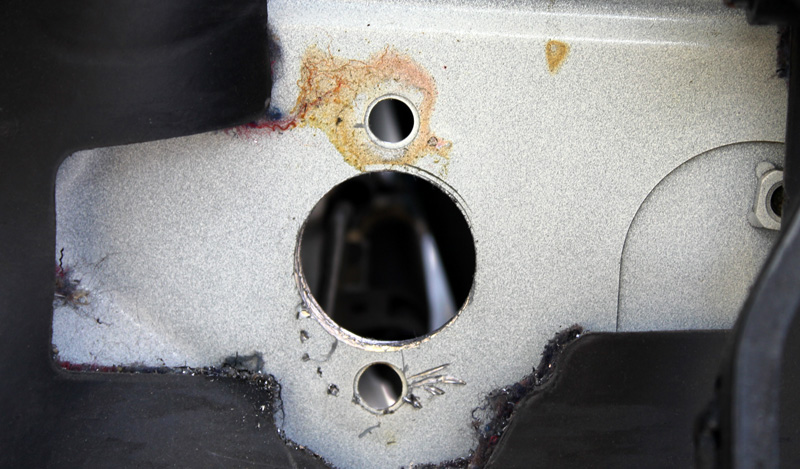
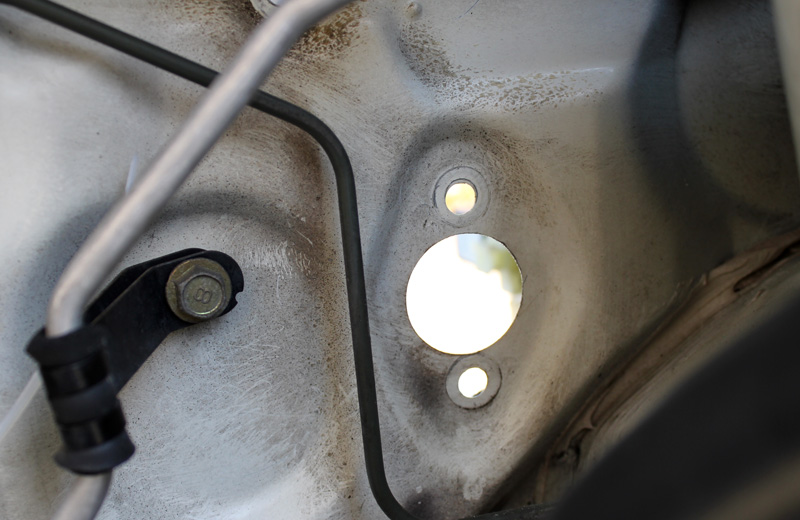
As expected, the auto and manual assemblies use the same bolts for their brackets and the firewall is even stamped for the clutch master cylinder. I found a hole saw that was the perfect size and did some quick cutting and cleaned it up with a file.

Inside the car.
Image

Engine bay.
Image

Image

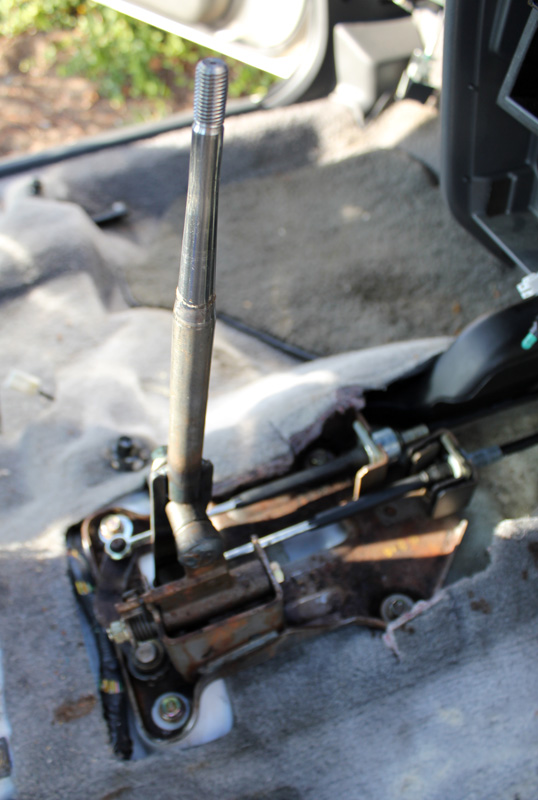
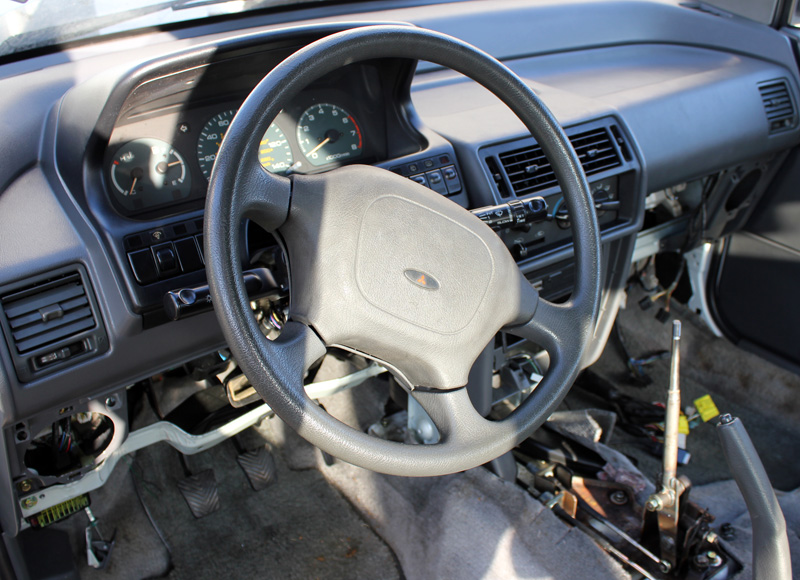
Here is a shot of the shifter installed. The Vista/LRV/Summit shifter assembly is definitely different than the Colt hatchback. The shifter works in the same fashion but the mounting holes are different and they employed a longer shifter since you sit higher in these cars. I also found an LRV steering wheel at the yards for about $15 so threw that in as well. It has 4 posts and the entire center is the horn whereas the Vista had 2 posts and buttons on the sides. Cheap and much sportier look...and I like the DSM badge. Ultimately, I'd like to get a Colt Turbo or aftermarket wheel but this will work for now.

Image

Image

Image

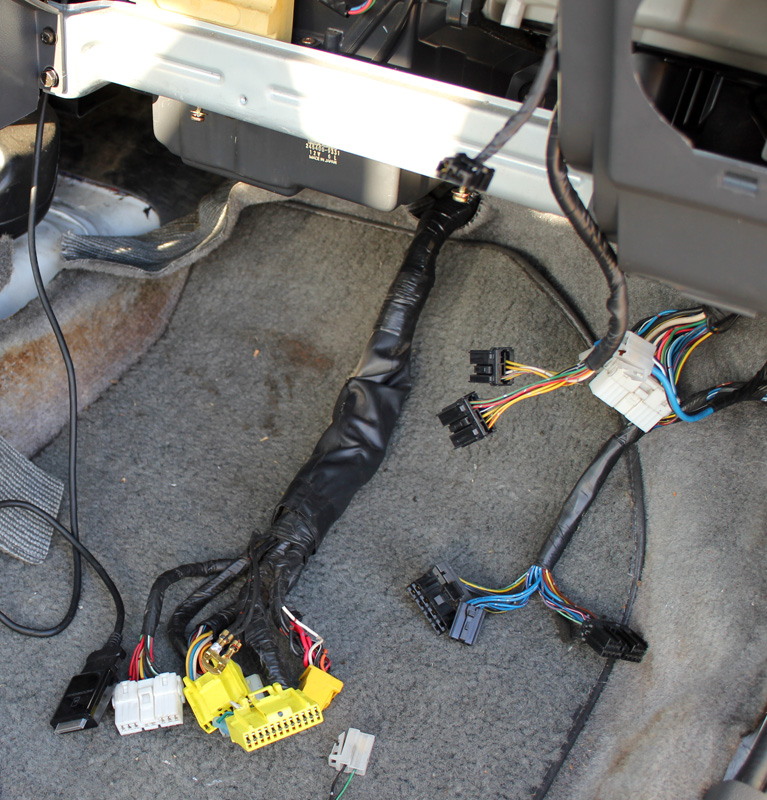
Heres a shot of the 4G63 harness installed. The clips that tie in to the chassis are different so I need to hunt down a Vista wiring diagram and figure that out. Shouldn't be too difficult once I find that. Since the harness is much longer (the Vista ECU is mounted on the passenger side wall under the dash) I am going to run the wires over to the center console and mount the 4G63 ECU where the Vista trans ECU was located. Much easier and cleaner than the alternatives.

Image

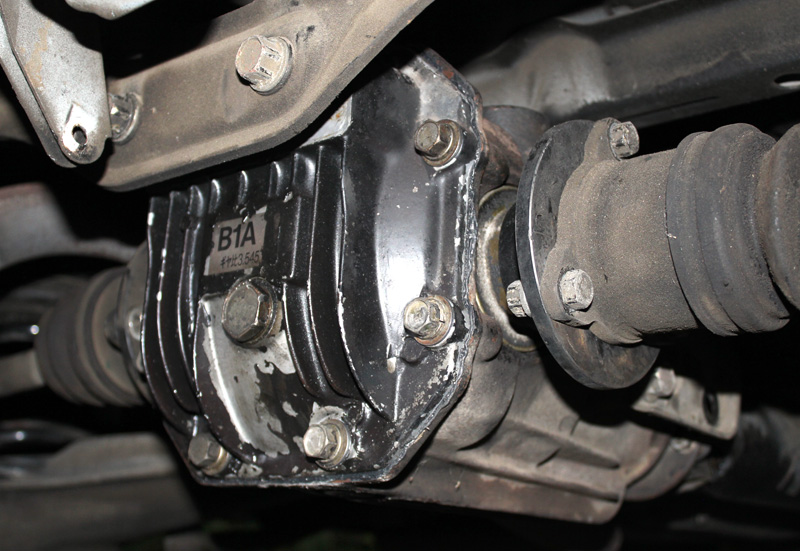
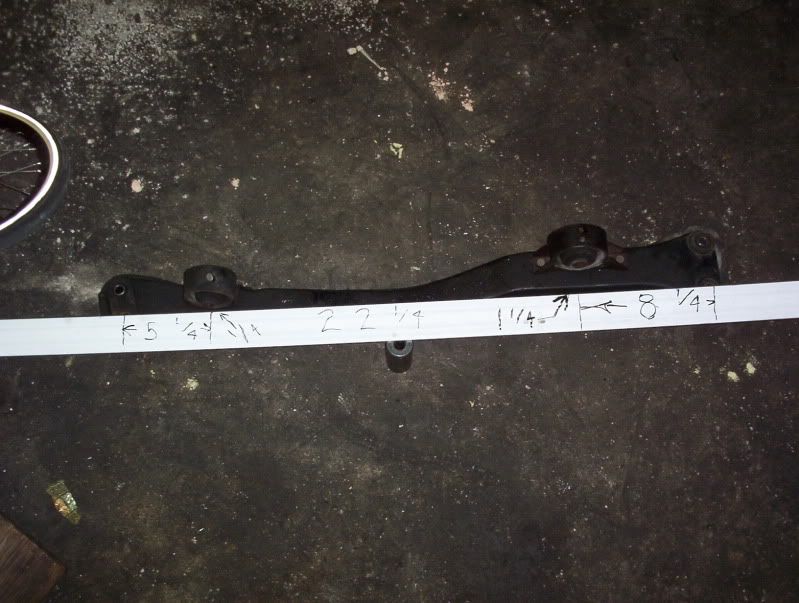
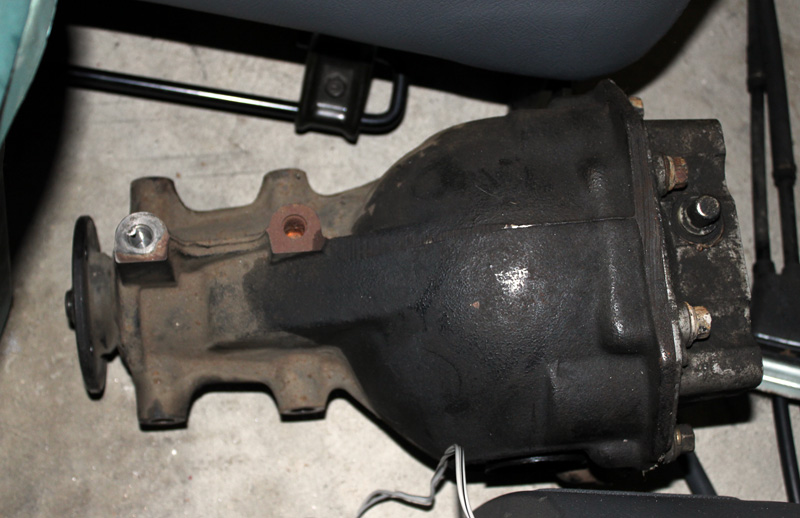
So, the rear differential was a big concern. The Eclipse rear axles slide in to the diff and bolt to the stubs on the outside. The Vista has the opposite set up with the stubs mounted in the diff. Although the rear ends look very similar (see below) there are a few differences. They both mount to the rear moustache bar the same way. However, the front half of the case is different. The Vista has a soft mount and employs 2 bolts on each side and uses 1 bolt on the top. The Eclipse only has 2 bolts on the side and uses 2 bolts on top. Since it didn't look like a straight swap we took both diffs to a transmission shop to see what the options were.

A week later they called back and said they could put the stubs in the Eclipse rear (small compromise since it uses less bolts on the side) for $375. If I wanted all of the guts swapped over it would be $650. I decided to pick up the diffs and think about it. Worse case scenario we figured it was worth trying to swap everything ourself and if it didn't work we were in the same position having to pay to have the work done. Both of the back covers were off and one axle stub had been removed from the Vista diff but I was in a hurry so dropped them at Dan's house and took off. A few hours later Dan called and said he had a rear diff ready to install! The Vista axle stubs use retaining clips just like front axles so are fairly easy to remove. Fortunately, they also slide right in to the Eclipse 3-bolt rear. Needless to say, the trans shop was going to rip me off big time w/ the $375 quote to simply swap the axle stubs! I'm going to call and give them (Certified Transmission) a piece of my mind. In my opinion, this type of business practice is totally unacceptable and I will NEVER recommend this shop to anyone.

Vista Rear Diff. You can see the 4 prongs on the side for the bolts and the 2 in the top. As you will notice, only one on the top looks used because the Vista only uses one bolt. I'm assuming this would bolt directly in to an Eclipse since it uses 2 bolts on the top.

Image

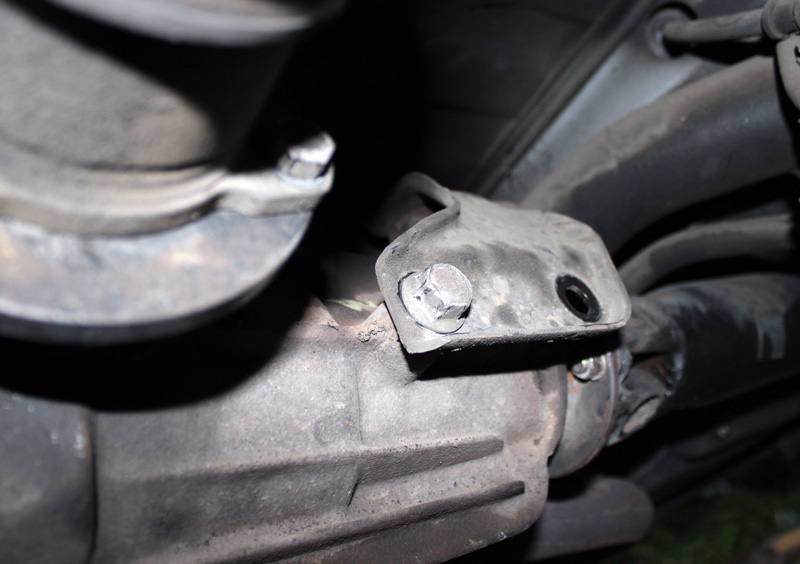
Vista axle stubs installed in the Eclipse 3-bolt rear. In the second picture you will see where the other 2 bolts would go on the Vista diff but the Eclipse doesn't have provisions for this. I don't think this will be an issue so am only going to address it if it becomes one.

Image

Image


Top
   
PostPosted: Tue Aug 02, 2011 5:19 pm 
Offline
Spends Too Much Time Under The Hood
User avatar

Joined: Fri Apr 04, 2008 8:30 pm
Posts: 376
Location: Chelmsford, MA
So, why did you convert to a DSM 3 bolt rear end? Is it actually stronger?

Also, the soft mount in the front of the wagon rear ends is very similar to a 2G DSM rear end. And it is natorious for failing! To be precise, it flexes so much, that entire diff housing cracks apart! But usually, it only effects 2.3/2.4 torque monster engines (one of the reasons why I dislike these engines).

I wounder if we could use a 2G rear end, complete with 2G axles? It might take some screatice mixing and matching, but it just might work!!!

_________________
Leon R.
99 Eclipse Spyder GST (AWD swap project)
93 Eagle Summit AWD (4G63 swap) 11.69@120
01 Isuzu VehiCHROSS (winter beater) 17.0@80
80 Triumph TR7 (4G63 swap project)


Top
   
PostPosted: Tue Aug 02, 2011 6:23 pm 
Offline
CSM Junkie
User avatar

Joined: Thu Jul 06, 2006 4:22 am
Posts: 604
Location: Whale's Vagina, Commiefornia
Quote:
So, why did you convert to a DSM 3 bolt rear end? Is it actually stronger?
It was an auto so we had to change the gear ratio. That was the only motive.

The plan is to go easy on it at first and see how it does, if nothing else we can move the car under its own power. It wouldn't be too difficult to change ring and pinion and use the stock diff. We could also reinforce it so it's much stronger.

_________________
'18 X5
'19 M5 Comp
'07 997 Turbo, 1144WHP/1001WTQ
'17 Fiesta ST


Top
   
PostPosted: Wed Aug 03, 2011 12:34 am 
Offline
Spends Too Much Time Under The Hood
User avatar

Joined: Fri Apr 04, 2008 8:30 pm
Posts: 376
Location: Chelmsford, MA
Got you. I would love to get LSD working on my van, but to make that happen, you would need an LSD style passenger side axle cup. That is why I would like to try to adapt DSM rear end and axles.

I do have a spare wagon rear end asembly to play with, so that should make it easier.

Have you looked into doing rear disc brake conversion? ABS vans should have come with discs, but I haven't been able to find one at the junk yard. Those must be ultra rare :(


Top
   
PostPosted: Wed Aug 03, 2011 9:26 am 
Offline
Member

Joined: Thu Feb 26, 2009 11:15 am
Posts: 137
Location: San Diego
Quote:
Also, the soft mount in the front of the wagon rear ends is very similar to a 2G DSM rear end. And it is natorious for failing! To be precise, it flexes so much, that entire diff housing cracks apart! But usually, it only effects 2.3/2.4 torque monster engines (one of the reasons why I dislike these engines).

I wounder if we could use a 2G rear end, complete with 2G axles? It might take some screatice mixing and matching, but it just might work!!!
if nothing else im thinking it would be super easy to reinforce the rear diff mount. so far that seems much easier than swapping over to a completely different rear end. unfortunately, i think the rear suspension set up on this thing is going to pose the biggest problem in regards to anything being a simple bolt in affair.
Quote:
Have you looked into doing rear disc brake conversion? ABS vans should have come with discs, but I haven't been able to find one at the junk yard. Those must be ultra rare :(
ive thought about the rear disc swap as well. i happened to see a van at the yards that had year discs but didnt pick any of the stuff up because i wasnt sure what was needed. if i remember correctly, chris thought it would only require the rear discs and calipers because of the way the e-brake is set up on the rear disc cars (the inside of the disc acts like the drum).

i have pics of the rear disc set-up but im not sure it would be very helpful in regards to what EXACTLY is needed. it would be a nice addition but im going to work on upgrading the fronts first i think (once its actually running!).


Top
   
PostPosted: Wed Aug 03, 2011 10:06 am 
Offline
Spends Too Much Time Under The Hood
User avatar

Joined: Fri Apr 04, 2008 8:30 pm
Posts: 376
Location: Chelmsford, MA
I am pretty sure that e-brake drums are smaller than the "real drum" brakes, so you can't reuse then. If we are lucky, we will be able to reuse the cable, but everything else would have to come from a disk brake car. The easiest thing would be to get complete rear traveling arms from the donor car.

Have you guys ever seen ABS/rear disc combination on sliding door/short wagon?


Top
   
PostPosted: Wed Aug 03, 2011 8:00 pm 
Offline
CSM Junkie

Joined: Wed Jan 30, 2008 7:55 pm
Posts: 447
Location: Saskatoon, Saskatchewan
[quote="grndsm"]Got you. I would love to get LSD working on my van, but to make that happen, you would need an LSD style passenger side axle cup. That is why I would like to try to adapt DSM rear end and axles.

I do not understand. Please explain this to me. I figure if the you install a dsm lsd diff, you got lsd. What do axles have to do with anything?

My 93 colt van is stock disc brake rear with abs.


Top
   
PostPosted: Wed Aug 03, 2011 11:53 pm 
Offline
Spends Too Much Time Under The Hood
User avatar

Joined: Fri Apr 04, 2008 8:30 pm
Posts: 376
Location: Chelmsford, MA
Quote:
I do not understand. Please explain this to me. I figure if the you install a dsm lsd diff, you got lsd. What do axles have to do with anything?
DSM LSD works by tapping into a viscous coupling on the insde of the diff. To do this, passenger side axle has a splined extention that reaches deeper into the diff. That is why DSM LSD axles are not the same from side to side (non-LSD rear ends have identical axles).

So if you were to install non-LSD axle into LSD rear end, I predict it will act like a non-LSD rear end.
Quote:
My 93 colt van is stock disc brake rear with abs.
Cool! Have you ever posted photos of the rear brakes?

_________________
Leon R.
99 Eclipse Spyder GST (AWD swap project)
93 Eagle Summit AWD (4G63 swap) 11.69@120
01 Isuzu VehiCHROSS (winter beater) 17.0@80
80 Triumph TR7 (4G63 swap project)


Top
   
PostPosted: Thu Aug 04, 2011 8:59 pm 
Offline
CSM Junkie

Joined: Wed Jan 30, 2008 7:55 pm
Posts: 447
Location: Saskatoon, Saskatchewan
Your explanation makes perfect sense. I bet it isnt that hard to keep the dsm axle cups though...

I was thinking about this after i posted last night. If the van diff mounts like to flex and are weak then you would be better off without lsd. Lsd would put way more torque on the subframe. O course if one really wanted to i dont imagine it would be too hard to beef up the subframe while the diff is out.

Did you try to swap out the cv/ends of the axles for dsm ones? cause that would be the easiest way. Are the splines different or something?

I can take pics of my brakes if that helps for anything (or if you just dont believe me) Dont forget its a canadian van, maybe it was more common here.


Top
   
Display posts from previous:  Sort by  
Post new topic  Reply to topic  [ 144 posts ]  Go to page Previous 1 2 3 4 510 Next

All times are UTC-05:00


Who is online

Users browsing this forum: No registered users and 5 guests


You cannot post new topics in this forum
You cannot reply to topics in this forum
You cannot edit your posts in this forum
You cannot delete your posts in this forum
You cannot post attachments in this forum

Jump to:  
cron
Powered by phpBB® Forum Software © phpBB Limited